|
Production of quality planting materials
(a) By clonal seeds
The seeds are collected and seedlings are raised during July-September. Seeds of
clones are termed clonal seeds. Hybrid polyclonal seeds collected from approved
polyclonal seed gardens are the seed material recommended for planting in the country
and abroad.
(b) By budded plants
In the budding process, a patch of bark of the seedling plant (stock) is replaced
by a patch of bark with a dormant bud (bud patch) taken from the clone to be multiplied.
The bud patch gets attached to the stock permanently and becomes a part of it. The
stock is then cut off above the budded portion and the grafted bud develops into
a shoot (scion) exhibiting the characters of the plant from which it is taken. The
new tree thus formed is a two-part tree, comprising a root system belonging to the
stock plant and a shoot system contributed by the donor of the bud.
Depending on the colour and age of the bud as well as the age of the stock plant
used, three types of budding are mainly recognized. They are: (1) brown (conventional)
budding, (2) green budding, and (3) young budding. In the first method, older buds
having brown colour are used while in the other two, green tender buds are utilized.
Depending on the part of the stock where budding is carried out, budding is classified
into: (1) base budding, (2) crown budding, (3) over budding, and (4) high budding.
Base budding is carried out at the base of the stock plant.
Brown budding
Brown budding is generally carried out by grafting brown coloured buds taken from
budwood of about one year's growth onto the stock plants of 10 month’s or
more growth. Vigorously growing healthy stocks having a girth of 7.5 cm at the collar
region are ideal for budding.
Stocks should be budded when the bark peels off very easily. Peeling is usually
good when the top whorl of leaves is well developed, but before further extension
growth commences. Test peeling of a small patch of bark above 15 cm from the base
is the sure method to assess the peeling quality of the bark.
Brown buds are usually obtained from brown budwood produced by budded plants raised
in budwood nurseries. Buds found in the axils of fallen leaves are generally utilized
for budding. Budwood should be collected when the top whorl leaves have fully expanded
but not hardened, to ensure proper peeling of the bark and high budding success.
Collection of budwood should be done with sufficient care so as to avoid bruising.
As far as possible, budwood should be collected in the morning or evening, and should
preferably be utilized for budding as soon as collected. If budding is delayed,
special measures should be adopted for preventing moisture loss. Budwood is cut
into pieces of convenient length, usually 1 m. Good quality budwood will have around
20 healthy, well-formed buds per metre length. Weak and poorly formed buds should
not be used. Budding is usually carried out with a specially designed knife having
two blades, called budding knife. However, an ordinary pen-knife with a blade of
7 to 8 cm length could also be used.
Preparation of the stock plant:
- Clean the basal 15 cm to remove dirt, soil, etc. Cleaning can be done with cotton
waste or rags
- Make two parallel vertical cuts starting from about 2.5 cm above
the collar. The length of these cuts should be a little more than 5 cm and 1.5 cm
apart
- Make a horizontal cut joining the bottom ends of the vertical cuts. All
the three cuts should be made deep enough to reach the wood
- After making these
cuts, the latex is allowed to completely ooze out for a few minutes through the
cuts
- When the latex flow ceases, it is wiped off from the surface
- The
flap of bark separated by the three cuts is then gently lifted with the aid of the
knife and peeled upwards
- Alternatively, the upper ends of the vertical cuts
may be connected by the horizontal cut and the flap peeled downwards. The practice
of removing the flap completely is also adopted. The exposed region is called the
budding panel
Preparation of the bud patch:
- The bud patch should have a length of about 5 cm and a width of about 1.5 cm
-
Two parallel vertical cuts having a length of 5 cm are made on the two sides of
a bud, 1.5 cm apart
- Two horizontal cuts are made connecting the lower and upper
ends of these cuts. A little time is allowed for the latex to ooze out.
During this time, incisions are made around neighbouring buds of the same budwood
-
When the oozing of latex stops, it is wiped off and the bud patch marked out by
the four cuts, is stripped off by gently pushing to one side.
- The inner side
of the bud patch is examined carefully for the presence of the core of the bud,
which appears as a slight projection. If it is not present, the bud patch should
be discarded.
- The bud patch should be handled with utmost care so as to avoid any damage to the
cambium. It should always be held at the edges without touching the cambium. Foreign
matter like water, soil and sweat should not be allowed to fall on the cambium.
Similarly exposing the cambium to strong sunlight or dry wind can result in its
drying
- The four edges of the bud patch are slightly trimmed
Procedure of budding:
|
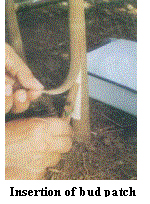
- The bud patch is gently placed in the budding panel after lifting the flap. It should
be placed in such a way that the bud is above the leaf scar and its inner side is
in contact with the budding panel
- Exposure of too much area of the budding panel
around the bud patch is unfavourable for budding success. At the same time the edges
of the bud patch and budding panel should not touch each other
- After placing
the bud patch in the budding panel, the flap, if retained, is placed back over it
and is then bandaged using polythene strips of 45 cm length, 2.5 cm width and 250
gauge thickness. Bandaging should commence at the bottom and move upwards in a close
spiral. During the first few turnings of the bandage, the lower end of the flap
should be kept gently pressed over the bud patch to prevent it from slipping. Bandaging
should be tightened to keep the cambium tissues of the budding panel and the bud
patch in intimate contact with each other. The end of the tape is finally kept intact
with a knot
- In the field and along borders of nurseries it may be necessary
to shade the bud patch against strong sunlight. This can conveniently be done by
tying a rubber leaf over the bud patch
If the budding is successful, the cambium of the stock plant and that of the bud
patch unite and the bud patch establishes as a part of the stock. The plant is left
undisturbed for 20 days after which the bandage is removed. The flap, if it had
been retained, is cut a little above the upper end of the bud patch and removed.
Freshness of the bud patch indicates initial success of the budding. The final success
is ascertained in a similar manner after another 10 days.
Green budding
Both the stock plant and budwood used for green budding are very young. Seedlings,
which are 2-8 month old, are used as stock. Buds are collected from 6-8 week old
budwood, also known as bud shoots or bud sticks. Buds found above the scale leaves
of the shoots alone are used for budding.
Young, vigorous seedlings raised in nursery or in polythene bags are used as stock
plants for green budding. Plants having a girth of about 2.5 cm at the base, with
brown bark up to a height of about 15 cm, can be used for this purpose. The stock
plants require about four to five months to attain this size. By proper care, this
period could be further reduced.
Green budwood is obtained from budwood plants (source bushes) grown in nurseries
for this purpose. They are collected when 6-8 week old, when they have a length
of 30-60 cm with a whorl of leaves at the top. The bud shoots are harvested by cutting
at the base with a sharp knife. For proper peeling of the bud patch, harvesting
should be done when the leaves are copper brown to dark green in colour. After harvesting,
the leafy portion of the shoot is cut off. The non-leafy portion shows 2-5 scale
leaves with axillary buds, which are utilized for budding.
Preparation of the stock plant:
- Clean the basal portion of the stock. Two vertical incisions, a little more than
5 cm long and 1 cm apart are made starting from a point about 2.5 cm above the collar
region.
- The lower ends of these cuts are joined by a horizontal cut and a few minutes allowed
for the cessation of latex flow.
- The flap is then cut off leaving a short "tongue" of about 1.5 cm at the
top. The stock is now ready to receive the bud patch.
Preparation of bud patch:
The bud patch can be stripped from the bud shoot in the same way as in the case
of brown budding.
Procedure of budding:
- The upper end of the bud patch is gently inserted under the `tongue’ and placed
in the budding panel
- The bud patch is secured firmly by bandaging with a transparent
polythene strip. This strip should be about 25 cm long and 2 cm wide. Transparent
tape is insisted upon as it allows light to fall on the green bud patch, which in
turn enhances budding success. For the same reason, no shading is given
- Buds
are examined three weeks after the budding by observing through the bandage or after
removing the bandage. Retention of the green colour is the indication of budding
success
- Final observation on budding success is done after 10 more days. If
the observations are made through the bandage, after the second observation, the
bandage is removed. The plant is now ready for cutting back
Budding can be carried out at any time of the year. However, too dry or very wet
weather is unsuitable. Generally more success is obtained during rainy season than
in summer. In India, the period from May to December is generally suited for brown
budding. The success rate of green budding is more during summer months. However,
heavy rainfall is not suited for budding. For best results, budding should be carried
out either in the early morning or in the evening.
Advantages:
- It utilizes the growth of the stock more efficiently, i.e. when green budded plants
are cut back, only a small amount of stock growth is lost
- Green budding is simpler
and faster than brown budding and hence more number of plants can be budded reducing
the labour cost per budding
- It is more adaptable for production of advanced
planting materials
- It gives higher percentage of success during summer than
brown budding
- Opening of the budding and cutting back can be done simultaneously,
thus saving labour cost
- Yield of green buds from a unit area of nursery is two
to three times that of brown buds
- After cutting back, green buds develop earlier
than brown buds
- Green budding is more suitable for crown budding
Defects:
- Green bud shoots cannot be retained in the nursery for long, after they become mature
enough for harvesting
- After harvesting, green sticks cannot be kept for long
periods, unlike in the case of brown budwood
- Scion of green budding is less
vigorous than that of brown budding and hence it requires very careful attention
during the early period of growth, especially in the field
Young budding
This is a kind of green budding carried out on very young plants less than two month
old. Stocks are raised in small bags of lay-flat size 33 cm x 15 cm.
The plants are given intensive nursing such as foliar application of fertilizers
and fungicides twice weekly and soil application of N-P-K-Mg mixture weekly. When
7-8 week old, they are green budded. Four weeks after budding, plants are cut back
leaving a snag of 20 to 25 cm length. Buds on the snag are nicked or the shoots
coming from then pruned off promptly. When the scion develops two or three whorls
of leaves, the plants are transplanted to the field.
Advantages:
- Bag plants could be produced within seven months after the planting of germinated
seeds in the bags, which is usually done in August/September. The time required
for this is around nine months in the case of normal green budding
- Since small
bags are used for the production of plants transportation is easier
- The cost
of production is also slightly less compared to the normal method
- Since the
stock plants required for young budding are raised by sowing seeds directly in the
bag, these plants have a better developed root system than the plants raised from
green budded stumps. A well-developed root system prevents breaking of soil core
and ensures faster and easier establishment of plants after transfer to the field
Defects:
- By the time the bag plants produced from young budding are ready (March-April) the
climate becomes unfavourable for field planting. Hence planting has to be delayed
up to the onset of monsoon (June). Bag plants produced from green budding also become
ready by this time
Crown budding
An undesirable crown can be replaced by a desirable one through crown budding. The
tree produced by crown budding is a three-part-tree comprising the root system of
the stock plant, trunk of one clone and the crown of another clone. Thus the desirable
characters of the trunk of one clone and crown of another clone are combined.
Crown budding is ideally carried out when the scion of the budded plant has attained
a height of 2.4 – 3.0 m (1-2 year old). Budding is carried out at a height
of 210 to 240 cm on the inter-whorl region below the top whorl of leaves. It should
be done only when the top flush of leaves are fully expanded and hardened. Stem
tissue should be green or dark green at the time of budding. This ensures maximum
budding success.
Plants having height up to 4.5 m can also be used for crown budding. In the case
of such overgrown plants having green tissue at a height higher than the prescribed,
the height of budding has to be raised correspondingly, so as to carry it out below
the top whorl. For crown budding, the green budding technique is followed. Since
the budding has to be done at a higher level, a self-supporting ladder should be
used. On no account should the plant be bent for budding or any other operations.
If the budding is a failure, re-budding is done on the opposite side of the stem,
5 cm above or below the first budding.
Successfully budded plants are cut back leaving a snag of about 5 cm. Treating the
cut ends of the stem with some wound dressing compound is desirable. The trunk shoots
arising after cutting back, should be pruned regularly at fortnightly intervals.
This should be continued until the crown bud sprouts and the crown shoot grows to
a length of about 2.5 cm. After that, two or three trunk shoots arising about 15-45
cm below the crown shoot are allowed to grow. These shoots should be spaced apart
and be on different sides of the stem as far as possible. They should never be allowed
to become more dominant than the crown shoot, as this may suppress the growth of
the latter. For this, if necessary, the top portion of the trunk shoots may be pruned.
About nine months after cutting back, when the crown-trunk union is firmly established,
the trunk shoots are pruned.
Over budding
Budwood plants are budded at higher levels for converting an existing budwood nursery
of a clone to another clone without replanting. The method is adopted to carry out
budding at the basal portion of the brown budwood before harvesting it.
The budwood is harvested after the new bud is successfully attached to the plant,
by cutting above the budded portion. Since the budding is carried out on a well-established
plant, the scion emerging from the new bud grows vigorously producing more budwood
compared to a newly established budwood plant. Thus it is a quick and economic method.
High budding
This is a type of crown budding where seedlings are budded at a level of about 90
cm from the ground. The aim of this technique is to combine the desirable characters
of both seedlings and budded plants, i.e. vigour of seedlings along with high yield
and uniformity of buddings.
(c) By tissue culture plants
Propagation of rubber is possible through tissue culture also. Different parts of
the plant such as embryo, anther, shoot tip and integument can be used for tissue
culture.
|