|
Selection of planting material is most important in cashew cultivation. Cashew is
highly cross pollinated and vegetative propagation is mainly recommended on commercial
scale to produce true to type planting materials.
Cashew can be propagated by seedlings, air layers and softwood grafts. Since it
is a cross-pollinated crop, vegetative propagation is recommended to obtain true
to type progeny. Field establishment of air layers has been found to be poor. Hence
softwood grafts, which give a high rate of establishment and early flowering, are
recommended for planting.
I. Propagation by seedlings
Selection of mother trees
Select mother trees having the following characteristics:
(1) Good health, vigorous growth and intensive branching habit with panicles having
high percentage of hermaphrodite flowers.
(2) Trees of 15-25 years of age.
(3) Bearing nuts of medium size and weight (5-8 g/nut) with an average yield of
15 kg nuts per annum.
(4) Bearing 7-8 nuts per panicle.
Selection of nuts
Select mother trees in February and collect seed nuts in March-April. Select good,
mature, medium sized nuts, which sink in water as seeds after drying in sun for
two to three days.
Raising seedlings
Raise seedlings in polythene bags during May. Use polythene bags of size 20 cm x
15 cm and fill the bags with garden soil, leaving a gap of 1 to 1.5 cm above. Soak
seed nuts in water for 18 to 24 hours to hasten germination. Sow the pre-soaked
seed nuts in polythene bags filled with garden soil at a depth of 2-3 cm with the
stalk end up. Seeds germinate in seven to ten days.
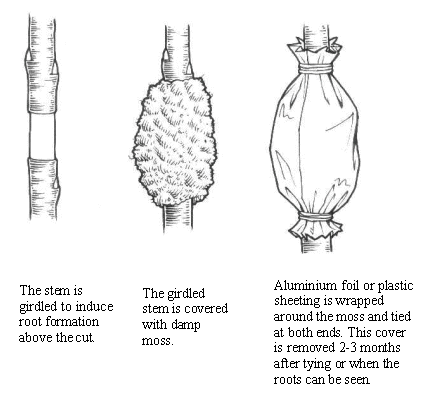
II. Propagation by air layering
Prepare air layers during February-March, so that they will be ready for planting
in June-July. Select 9-12 month old pencil-thick terminal shoots. Remove carefully
a strip or ring of bark, 0.6 to 1.2 cm thick by using a sharp knife without injuring
the underlying wood. Wind a string around the cut area and cover it with moist moss
or wood shavings or sand and saw dust mixture or ordinary potting mixture and wrap
round with 150-200 gauge polythene film of size 23 x 15 cm. Secure loose ends of
film with jute fibre. When roots emerge from the ringed portion in 40-60 days, give
a 'V' cut at lower end of treated shoot. After about 15 days, deepen the cut slightly.
Cut and separate rooted shoot about 7 days later. Pot the layers immediately after
separation from the tree into containers of size 15 x 15 cm made from coconut husk
and keep them in shade. Avoid excessive watering. Plant the layers along with the
container in the prepared pits with the onset of southwest monsoon. Provide shade
and mulch with dry leaves to reduce sun-scorch in tender plants. It is advisable
to defoliate the layers two weeks before separation from the mother plant.
III. Propagation by grafting / budding
Different methods of grafting viz., epicotyl grafting, softwood grafting, veneer
grafting, side grafting, patch budding etc. have been tried in cashew with varying
degrees of success. Among them, softwood grafting was found to be the best for commercial
multiplication of cashew.
Softwood grafting & nursery management in cashew
A. Establishment of scion bank:
1. Production of scion sticks
The scion bank should be established with the recommended varieties of the region.
-
The plants should be planted in a closer spacing of 4 m x 4 m , in order to get
continuous supply of scions.
-
It should be fertilized with recommended quantity of NPK during monsoon and tender
shoots should be protected by timely sprays of insecticides.
-
The flower panicles should be cut off in order to get more number of scions.
-
The plants in the scion bank should be maintained by heading back the top to a height
of 1.5 m from ground level and by pruning the dried branches.
-
Pruning of trees may be carried out annually during September–October in the scion
bank.
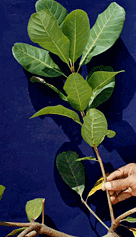
2. Selection of scion and precuring
-
Select non-flowered, 3-5 month old lateral shoots of current season’s growth
-
The selected shoots should be about 10-12 cm long, straight, uniformly round with
pencil thickness, brown coloured having dormant plumpy terminal buds.
-
The top 4-5 leaves should be dark green in colour indicating proper maturity of
the scion sticks.
-
The selected scion sticks should be precured by clipping off leaf blades, leaving
petiole.
-
The scion sticks can be detached from the mother tree after 8-10 days, before they
sprout and utilized for grafting.
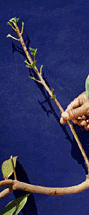
3. Collection of scion stick
-
The pre cured scion sticks should be separated early in the morning to avoid desiccation
and its length should not be less than 10 cm.
-
Soon after separation from the mother tree, scion sticks should be dipped in water
and placed in a polythene bag of 100 guage thickness and brought to the nursery
shed for grafting.
-
The scion sticks wrapped in sphagnum moss cloth and placed in a polythene bag of
100 guage can be kept for 3-4 days and used for grafting, if necessary.
Raising of root stock seedlings:
Selection of seednuts
-
Collect fresh seednuts during the peak period of harvest in February-March and sun
dried for 2-3 days.
-
Quality seed nuts may be selected by immersing in water or 10% saline solution.
Seeds which sink in water may be selected.
-
Medium sized nuts of 7-9 g should be selected in order to get uniform and vigorously
growing seedlings required for soft wood grafting.
-
The seeds should be bold and the highest specific gravity of more than 1.0. The
sun dried, graded seeds should be treated with carbaryl (5g/Kg of seeds) before
storing them in gunny bags or polythene bags. The bags should be arranged on wooden
planks in the store room.
Preparation of potting mixture
-
Prepare the potting mixture in the proportion of one part red soil, one part sand
and one part compost in heavy rainfall areas and one part red soil, one part compost
in low rainfall areas and mixed with little quantity of rock phosphate (10g/2Kg
of potting mixture).
Filling polythene bags
-
Use high density polythene bags of 25 cm x 15 cm size and 300 gauge thickness for
filling potting mixture.
-
Punch about 30-40 holes of 0.5cm diameter uniformly on the polythene bags for ensuring
good drainage. The bottom corners of the polythene bags should be folded inside
before filling potting mixture.
-
Before filling the polythene bags place few dry leaves (leaf mould) and small pebbles
at the bottom of the bag for better drainage.
-
Fill the bags properly up to the brim with the potting mixture and arrange the bags
in beds of 1000(10x 100) number in each.
Sowing of seeds
-
The seednuts should be soaked in water for 12-24 hours before sowing in order to
get good germination.
-
Pre-soaking of seeds results in earlier and higher percentage of germination.
-
At the time of sowing the soil should be moist and loosened in the polythene bag.
-
Sow the seeds in the centre of the bag, stalk-end upwards, with a depth of not more
than 2.5 cm and cover with little soil.
-
Water the polythene bags immediately after sowing and daily during drier months.
Excess irrigation should be avoided.
-
The seednuts usually germinate within 15-20 days after sowing.
-
Seed bed may be mulched with paddy straw till germination takes place and partial
shade may be provided during summer months.
-
To control pests while seeds germinate, malathion 5% dust, or spraying of chloropyriphos
(durmet 20 EC:0.05% ) should be applied.
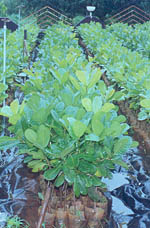
Maintenance of seedlings in the nursery
-
Daily watering is required during summer season.
-
During rainy season, to avoid water stagnation and disease occurrence, seedlings
may be covered by polythene sheet.
-
To get vigorous seedlings with single main stem, the side shoots arising from the
leaf axils should be removed frequently.
-
In order to prevent penetration of roots into the ground when seedlings are kept
in same place for three months, they have to be shifted and arranged in beds of
different place.
-
To control tea mosquito and other sucking insect pests, ekalux @ 1.5 ml / litre
of water may be sprayed.
-
Select 45-60 days old seedlings as root stocks for grafting.
|
|
B. Soft wood grafting technique:
1. Preparation of root stock
-
Disinfect the grafting knives by dipping them in fungicide solution.
-
Root stock seedling brought from the nursery beds should be kept in the nursery
shed under shade for grafting .
-
Remove the leaves by a sharp grafting knife leaving two pairs bottom leaves.
-
At a height of 15-20 cm from ground level a transverse cut is made on the root stock
and the terminal shoot is removed.
-
A cleft of 6-7 cm deep is made in the middle of the decapitated stem by giving a
longitudinal cut.
-
A little portion of wood is removed from the inner sides of the cleft at the top,
so that after grafting the joint will be perfect.
|
|
2. Preparation of scion
|
-
Select a matching scion stick (same thickness as that of the rootstock).
-
The cut end of the scion is shaped to a wedge of 4-5 cm long by chopping the bark
and wood from two opposite sides.
-
While preparing the wedge, the gum on the cut surface should not be disturbed and
the cut surfaces should not be soiled by touching with fingers.
|
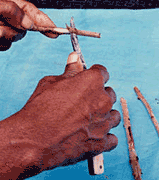
3. Grafting
-
The wedge of the scion is inserted into the cleft of the root stock to see that
the cambial layers of both the root stock and the scion come in perfect contact
with each other.
-
The graft joint is secured firmly with 2.5 cm wide and 30 cm long polythene strip
of 100 gauge thickness.
-
A long and narrow HD polythene bag of 15 cm x 12.5 cm size and 100 gauge thickness
is inserted on the grafted plant, tied at the bottom with a single knot in order
to protect the scion stick from drying up.
-
In places with high humidity the polythene cap need not be used.
-
The freshly grafted plants are left in the nursery shed for about two weeks to encourage
sprouting of the terminal buds.
-
After two weeks the polythene caps are removed gently and the grafts are shifted
to open condition in the nursery.
-
Within 3-4 weeks, 70-80% of the grafts will sprout.
-
Graft ready for planting within 5-6 months.
-
The success in softwood grafting is more during the period from March to September
under Kerala conditions.
Seasonal influence on graft success
-
The success of soft wood grafting is higher during the monsoon season- June-November
-
During other season graft success is slightly reduced due to non-availability of
proper scion sticks and unfavourable weather conditions.
-
The average graft success throughout the year is 65-70%.
Management of cashew grafts in the nursery
-
Cashew grafts should be watered daily during dry periods.
-
During rainy season, excess water should be removed.
-
Plants in the nursery should be shifted at least once in a month to avoid penetration
of roots in the ground.
-
During summer months (January-May) grafted plants should be protected by providing
partial shade by erecting pandal of dry coconut fronds or nylon nets.
-
Bordeaux mixture spray (1%) may be given at 10 days interval during rainy season
to control fungal infection of tender seedlings and grafted plants.
-
Ekalux (1.5ml/litre of water) may be sprayed to control sucking insects and leaf
eating caterpillars as and when the damage is seen.
-
The flower panicles produced by the graft should be removed as and when observed
in the nursery.
-
The polythene strip should be removed from the graft joint after four months of
grafting.
-
The bottom leaves on the root stock should be removed after three months of grafting
when scion leaves turn bronze colour to green.
Top
|